Tuesday
Jun262012

MAQUETTES

One of the ways I work with clients so we understand all the parameters of a project design, is to create a maquette.  A maquette is a small work-up of the project.  This is generally used on sculpture projects and provides a better visual to the client.  Mosaic art work has many factors, the individual tesserae, the andamento (flow & placement), and the grout color.  I highly recommend creating grout color swatches so the client may choose which grout color they prefer. 

These swatches all contain the same tesserae yet have different grout colors.  Notice the difference the grout can make.


The client picked the white grout and I grouted the maquettes. 


The maquette is generally a to-scale sculpture.  These were not designed to scale, only as examples.  Even so, the client has a pretty good idea of what the finished project will look like when combined with the rendering.

Sunday
Jun102012

GOLD AWARD PROJECT

Meet Kat.  Katarina Marie Hernandez.  Kat is a Girl Scout who is working toward her Gold Award, the most prestigious scouting award there is.  I never made it to Girl Scout.  I was a Brownie who refused to fly up! I thought the term sounded stupid.  Boy, was I ever wrong about that.  Over the years I have come to have great respect for the Girl Scouts and their training.  And so, I am humbled to be asked to be an advisor for a Gold Award.  I also like that Kat and I have such similar names.  My middle name also happens to be Marie.


Kat's project:  Restoration of Mosaics at Calvary Hill Cemetery, Dallas, TX

The mosaic monument was fabricated by Kat's Great Uncle, Joacquin Medrano, under the supervision of Octavio Medellin.  Octavio Medellin was one of the founders of the Creative Arts Center where I now teach mosaic art classes.  Octavio Medellin's grave is found facing this very monument.  Kat's project will restore the sections of mosaic that have come apart.  She will honor her ancestors by caring for their creations, and she will provide our community with a piece of history so readily forgotten.  If not for Kat and her Gold Award Project, the mosaic monument would have been torn down as it continued to need restoration.  It's time now to SAVE THE MOSAICS!!!


Kat has her work cut out for her.  She says she will start a blog so I don't want to say too much here until she does.  Once started, we will link our blogs to keep you posted on the project.


Tuesday
May292012

DEATH & FLOWER STEMS

My life shifted a bit this year with the sudden death of my father.  His 81st birthday would have been tomorrow and I am not quite so certain of or yet adjusted to his physical absence.  He was a great supporter of me doing my own thing and still I noticed right after he passed that perhaps I was not living my life as full as might be possible.  I noticed the areas where I play things safe, try to look good, not rock the boat or upset anyone, etc.  I do like for things to be nice, I do like to be gentle and kind, I do want people to be happy.  I am a fairly mild human being.  I also think of myself as a tad bit eccentric.  So, with that in mind, I am reinventing myself as a mixture of Elegant and Eccentric.  I am building a new website.  I am taking time to care for my family.  I am taking time off from teaching in the Fall, reinventing how and what I teach, and starting again in 2013.  I  am making those sculptures I always wanted to make and was afraid they were too silly.  By the way, I am a bit silly too.  So, here's to life, here's to death and transformation, and here's to living a life you love.

Now, back to the flower sculptures:

The stem of the flower may be finished last, after the mosaic application.  In this tutorial, I am working it now as many of you have been patiently waiting.  Again, this flower will be an indoor sculpture and will sit on a pedestal or tabletop.

I wrapped the stem in blue tape to help hold things together.  In this photo, you can see where I have marked the area I plan to trim.  If your flower is an outdoor flower and will be set into a pipe, do not trim it.

You may click on the thumbnail to view a larger image.


Cut the wire with wire cutters.


Use epoxy putty, the kind used for plumbing repairs.  It's an easy-to-use substance that can be modelled like clay.  Wear rubber gloves and work in a ventilated area when using.  Basically, follow the directions on the packaging. 


Unwrap the putty.  It will be two colors.  Tear off a bit and knead it together to form a uniform and consistent color.  Work quickly.  If the putty starts to get warm, it is curing!  You want to have enough time to use it on your sculpture.


Begin applying the putty to the stem.  Work neatly and wrap the entire stem.  If your flower will be set into a pipe, work only the section closest to the petals in order to create the look of an elegant form.


For those outdoor flowers:

Assuming your flower is mosaicked and ready for setting into a pipe, now is the time to mix more putty, wrap the stem in a thick coating, and smoosh (a technical term similar to press) it into the open end of the pipe.  I recommend copper pipe cut to length before this step.  Add additional putty as needed for reinforcement and aesthete.  Let the putty cure as directed.  It can be painted when cured.

Here, I am finishing out the stem of the indoor sculpture with more epoxy putty.


Sculpt it to your liking and let cure.

Wednesday
Feb222012

Forget the promises and excuses.

Folks, once again, I let circumstances get in the way of writing this blog.  So, from now on, no more promises and no excuses.  What you get is what you get.  So many of you have written to tell me this tutorial makes a difference for you.  Thank you for all your kind words and enthusiasm.  Please note that what you create inspires me too.  I am looking forward to seeing what you make from my notes.

Our topic today is cutting styles.  In my last post I mentioned that triangles are a no-no in traditional mosaic methods.  It is appropriate to use traingles if you are drawn to them, however notice how all the points can converge to a single point that attracts the eye.  If you do not intend for the eye to be drawn to that place in your mosaic, then avoid the triangle.  I have used triangles in some of my works, especially when in a hurry to fill something in (see pink flamingo).  I find the style reminds me of taking the easy way out and as such it is not my favorite.  I have seen works by other artists who use triangles as fill areas to great effect.  Work this out for yourself as you go along.

Detailed area showing triangle shapes.

Styles of mosaic workings are referred to as OPUS.  There are regulated, patterned OPERA (plural of opus) and random, crazy-styled OPERA.  Each working gives the mosaic its ANDAMENTO, the movement or flow of the work.

My examples in the drawing show the talavera design I am working using various opus styles.  I've mixed them up as an example only and am afraid it does not read well.  For more information on cutting styles, there are many mosaic books out there that illustrate the techniques.

Drawing showing a mish mash of styles.

I have decided to make this flower sculpture as an indoor piece using smalti as my material.  I carried the armature around with me for weeks looking at it in different positions and settings, even hanging it upside down and considering the possibility of adding lights!  After a while, I settled on a simple setting appropriate for display on a table or pedestal.

Play with different opera.

Study the works of other artists you admire.

Study historical mosaics and identify the various opera.

Choose a material or set of materials for your flower.  Use only high-fire, frost-proof materials for outdoor works.

Consider whether you will work one side or both of the flower petals.  Remember, adding the glass or stone makes the piece heavier and you will need to make certain your petals can sustain the weight of the materials you choose.

Ciao!
Thursday
Dec222011

Design

How does one go about creating a design?  For me, I pick something I am interested in (talavera pottery), add a touch of something I've recently seen (the Jean Paul Gaultier exhibit), follow a bit of history (Mexican folk art, Greek motifs in pottery and mosaic), and mix it all up.  I often do a search-engine look at images and after many pages of images, I create my own design.  Other searches include research through books and periodicals as  there is still nothing quite like the feel of a good book in my hands.

The shape of my sculpture influences the pattern I choose for my design.  The long, tulip-like petals of this sculpture are similar to a pattern I often see on talavera pottery.  As I was drawing my design, I realized the pattern also looked very much like flower motifs I had seen on Greek pottery and in mosaic floors.  In doing research on the Greek flower motif, I could then see the connection to other cultural designs and before I knew it, I had traveled the world through a flower motif.


On Tuesday, I had the great joy of viewing the Jean Paul Gaultier exhibit at the Dallas Museum of Art and still being in the after-glow of his work, I am using stripes in my design.  

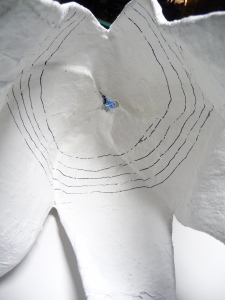
You can see, in the image below, that I have left a hole in the flower.  I plan to add a pistol/stamen by threading glass beads onto aluminum wire and inserting this into the cluster of wires that are part of the stem.  Aluminum wire can be found in many craft stores in the jewelry section.  It comes in many assorted colors and guages.  As I have not quite determined my color scheme, I will leave the choosing of the wire color toward the last.


Choose the type of material for your project based on where it will be located.  If  indoors, you may use low or high-fired materials.  If outdoors, only high-fired, vitreous, and natural stone materials will do.  I recommend choosing a mosaic material that is thin.  If your material is too thick it might be too heavy for this particular sculpture design.  Vitreous glass, stained glass, mirrored glass, porcelain dishware (particularly the teacups and saucers), and a thin porcelain tile like Cinca are all good choices.

Choose your adhesive for indoors or out.  For indoors, I recommend Weldbond glue.  For outdoors, use thinset.

Consider how you will place your materials on the design.  There are several traditional methods of laying tesserae (I will write a separate post on some of these methods).  To begin, consider working a central motif first, if you have one.  Next, begin an outline of that motif and of the edges of each petal.  In most traditional mosaic forms, we are often trained to avoid the use of triangles.  If you are inclined to create work in the traditional manner, by all means, avoid triangle tessera in your work!

Because I have not kept a regular schedule for these posts, I will post again in the next few days and will cover some tradtional opus patterns and designs. 

Here is an interesting  link to ceramic designs: http://ceramopolis.com